就在一年前,我创建了 Blowfish,一个 Hugo 主题,旨在构建我对个人主页的独特愿景。我还决定将其作为开源项目发布。今天,Blowfish 已经发展成为一个蓬勃发展的开源项目,在 GitHub 上拥有超过 600 颗星和数百名用户。在本教程中,我将向你展示如何开始并在几分钟内让你的网站运行起来。
TL;DR#
本指南的目标是引导 Hugo 新手如何安装、管理和发布自己的网站。代码的最终版本可在此 仓库 中获取 - 供那些想直接跳到结尾的人使用。

视觉风格只是 Blowfish 中众多可能性之一。鼓励用户查看文档页面并学习如何根据自己的需求自定义主题。此外,已经有来自其他用户的优秀示例可供参考。Blowfish 还以 shortcodes 的形式提供了几个额外功能,这些功能在主题中开箱即用 - 在这里查看并获取灵感。
设置你的环境#
让我们从安装所有需要的工具开始。本指南将涵盖 Mac 的步骤,因此这些说明可能不适用于你的硬件和操作系统。如果你使用 Windows 或 Linux,请查阅如何为你的操作系统安装 Hugo 和 GitHub CLI 的指南。
如果你使用的是 MacOS,让我们安装 brew - Mac 的包管理器 - 因为它将帮助安装和管理其他工具。
/bin/bash -c "$(curl -fsSL https://raw.githubusercontent.com/Homebrew/install/HEAD/install.sh)"安装好 brew 后,让我们安装 Git、Hugo 和 GitHub CLI。
brew install git
brew install hugo
brew install gh
为你的代码创建一个文件夹并在其中打开终端会话(我在下面的命令中选择了 blowfish-tutorial,你可以随意命名文件夹)。
mkdir blowfish-tutorial
cd blowfish-tutorial
进入文件夹后,下一步是初始化你的本地 git 仓库。
git init -b main现在,让我们创建并将本地仓库同步到 GitHub 仓库,以便你的代码远程存储。
gh auth login
gh repo create
git push --set-upstream origin main
查看下图了解我为本指南选择的选项,你可以根据自己的用例更改名称和描述。

最后,创建一个 .gitignore 文件,它允许你自动从仓库中排除某些文件。我建议从下面的示例开始。
#others
node_modules
.hugo_build.lock

# OS generated files
.DS_Store
.DS_Store?
._*
.Spotlight-V100
.Trashes

# Hugo
public
最后一步是将所有更改保存到仓库。
git add .
git commit -m "initial commit"
git push创建网站并配置它#
所有工具准备就绪后,创建和配置你的网站将很容易。仍然在你上一节创建的文件夹中,让我们创建一个空的 Hugo 网站(没有主题)。
hugo new site --force .脚手架完成后,尝试下面的命令来运行你的页面。在 https://localhost:1313 打开浏览器查看你的网站…
hugo server哎呀…页面未找到 – 对吧? 这是预料之中的,即使你创建了一个网站,Hugo 也不会提供任何默认体验 – 也就是说你的网站没有任何页面可显示。
下一步,让我们使用 git submodules 安装 Blowfish,这将使将来管理和升级到新版本更加容易。
git submodule add -b main https://github.com/nunocoracao/blowfish.git themes/blowfish接下来,在代码目录的根目录创建以下文件夹结构 - config/_default/。现在你需要下载这些文件并将它们放在你刚创建的 _default 文件夹中。最终结构应该看起来像这样。
config/_default/
├─ config.toml
├─ languages.en.toml
├─ markup.toml
├─ menus.en.toml
└─ params.toml
`
打开 config.toml 并取消注释 theme = “blowfish” 这一行,你就准备好了。尝试再次运行网站并在 https://localhost:1313 检查结果
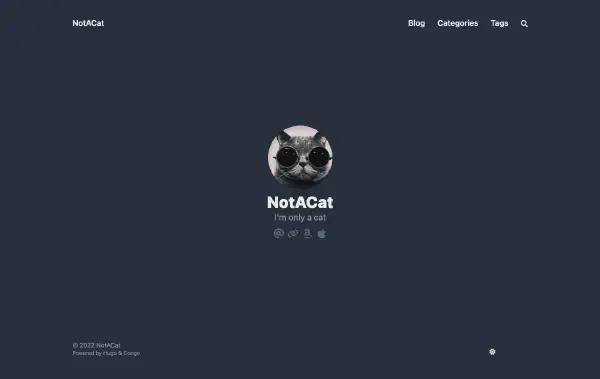
hugo server你应该看到类似下图的内容。目前还没有太多内容,因为我们还没有添加任何内容,但 Blowfish 的主要骨架已经就位 - 只需要配置。

现在让我们配置主题。
menus.en.toml#
这个文件定义了你的菜单结构,用于顶部横幅和页脚。对于本指南,让我们创建两个菜单部分:一个用于 Posts,一个用于 Tags。
- Posts - 将显示完整的条目列表
- Tags - 根据每篇文章上放置的标签自动生成
要实现这一点,确保 menus.en.toml 文件中存在以下条目。完成更改后,重新运行 hugo server 你应该会看到菜单出现。
[[main]]
  name = "Posts"
  pageRef = "posts"
  weight = 10

[[main]]
  name = "Tags"
  pageRef = "tags"
weight = 30languages.en.toml#
这个文件将配置你作为网站作者的主要详细信息。更改下面的部分以反映你的详细信息。
[author]
   name = "你的名字"
   image = "profile.jpg"
   headline = "我只是个人"
   bio = "关于你的简介" # 出现在每篇文章的作者卡片中
网站的图片应该放在 assets 文件夹中。对于这一步,请在该文件夹中添加一张名为 profile.jpg 的个人资料图片,或者将上面的配置更改为你选择的文件名。如果你没有可用的个人资料图片,可以使用下面的图片进行教程。

最后一步是配置你的链接 – 社交媒体、GitHub 等。该文件包含所有支持的选项,但它们被注释掉了。你可以取消注释所有内容并删除你不想使用的。在你决定保留的链接上替换正确的链接。你也可以更改顺序。
params.toml#
这是 Blowfish 的主要配置文件。大多数可用的视觉选项或自定义都可以使用它来配置,它涵盖了主题的多个区域。对于本教程,我决定使用 background 布局 - 查看 Blowfish 登陆页面的其他布局 - 配合 Neon 配色方案 - 如果你愿意,可以选择不同的配色方案 - 查看此列表或创建你自己的。
在 assets 文件夹中添加一个 image.jpg,它将作为网站的背景。你也可以下载我在本教程中使用的示例。

现在让我们进入 params.toml 并开始配置文件。我只关注需要更改的值,不要在阅读文档之前删除文件的其余部分。让我们首先确保我们有正确的配色方案,图像优化已开启,并配置默认背景图像。
colorScheme = "neon"
disableImageOptimization = false
defaultBackgroundImage = "image.jpg" # 用作背景图像的默认值
接下来,让我们配置我们的主页。我们使用 background 布局,配置主页图像和最近项目。此外,我们使用 卡片视图 显示最近类别中的项目。最后,让我们将页眉配置为固定。
[homepage]
  layout = "background" # 有效选项:page, profile, hero, card, background, custom
  homepageImage = "image.jpg" # 用于:hero 和 card
  showRecent = true
  showRecentItems = 6
  showMoreLink = true
  showMoreLinkDest = "/posts"
  cardView = true
  cardViewScreenWidth = false
  layoutBackgroundBlur = true # 仅在 layout 为 background 时使用

[header]
  layout = "fixed"
现在配置文章和列表页面的外观。以下是这些页面的配置。
[article]
  showHero = true
  heroStyle = "background"
  showSummary = true
  showTableOfContents = true
  showRelatedContent = true
  relatedContentLimit = 3

[list]
  showCards = true
  groupByYear = false
  cardView = true
如果你再次运行 hugo server,你应该看到类似下图的内容。

向你的网站添加内容#
在 /content/posts 中创建一个文件夹来放置你的帖子。这也是你菜单中配置的用于列出所有文章的目录。在该文件夹内,让我们创建一个新目录并将其命名为 myfirstpost。在其中创建一个 index.md 文件 – 你的文章,并在同一目录中放置一个 featured.jpg 或 .webp 作为文章的缩略图。使用下面的示例开始。文件中的前几行是 Front Matter,它告诉 Hugo 文章的外观和体验 – 不同的主题支持不同的参数。查看文档了解更多信息。
---
title: "我的第一篇文章"
date: 2023-08-14
draft: false
summary: "这是我网站上的第一篇文章"
tags: ["space"]
---

## 副标题

Lorem ipsum dolor sit amet, consectetur adipiscing elit. Morbi nibh nisl, vulputate eu lacus vitae, maximus molestie libero. Vestibulum laoreet, odio et sollicitudin sollicitudin, quam ligula tempus urna, sed sagittis eros eros ac felis. In tristique tortor vitae lacinia commodo. Mauris venenatis ultrices purus nec fermentum. Nunc sit amet aliquet metus. Morbi nisl felis, gravida ac consequat vitae, blandit eu libero. Curabitur porta est in dui elementum porttitor. Maecenas fermentum, tortor ac feugiat fringilla, orci sem sagittis massa, a congue risus ipsum vel massa. Aliquam sit amet nunc vulputate, facilisis neque in, faucibus nisl.
你可以创建额外的文章来查看网站有内容后的样子。你的网站应该看起来像下面的图片。主页显示最近的文章,每篇文章通过相关部分自动与其他文章连接,你有标签聚合和全文搜索。


发布它#
唯一缺少的就是发布你的网站。我将使用 Firebase 进行托管 - 它是一个免费的替代方案,如果你正在创建更复杂的东西,它还提供更高级的功能。去 Firebase 创建一个新项目。完成后,让我们切换到 CLI,因为这样配置一切会更容易。
让我们安装 Firebase 的 CLI - 如果不是在 Mac 上,请查看 Firebase 上的安装说明。
brew install firebase现在登录并为项目初始化 Firebase 托管。
firebase login
firebase init
选择 hosting 并继续。

按照下图选择我推荐的选项。确保设置 GitHub Actions 的工作流文件。这些将确保一旦仓库有更改,你的代码就会被部署。

但是,这些文件不会立即工作,因为 Hugo 需要额外的步骤才能使构建工作。请将下面的代码块复制并粘贴到 .github 文件夹中的相应文件中,但保留 Firebase 生成的文件中的原始 projectId。
firebase-hosting-merge.yml#
# This file was auto-generated by the Firebase CLI
# https://github.com/firebase/firebase-tools

name: Deploy to Firebase Hosting on merge
'on':
  push:
    branches:
      - main
jobs:
  build_and_deploy:
    runs-on: ubuntu-latest
    steps:
      - name: Hugo setup
        uses: peaceiris/actions-hugo@v2.6.0
        with:
          hugo-version: 0.115.4
          extended: true
        env:
          ACTIONS_ALLOW_UNSECURE_COMMANDS: 'true'

      - name: Check out code into the Go module directory
        uses: actions/checkout@v4
        with:
          submodules: true  # Fetch Hugo themes (true OR recursive)
          fetch-depth: 0    # Fetch all history for .GitInfo and .Lastmod

      - name: Build with Hugo
        env:
          # For maximum backward compatibility with Hugo modules
          HUGO_ENVIRONMENT: production
          HUGO_ENV: production
        run: hugo -E -F --minify -d public

      - name: Deploy Production
        uses: FirebaseExtended/action-hosting-deploy@v0
        with:
          repoToken: '${{ secrets.GITHUB_TOKEN }}'
          firebaseServiceAccount: '${{ secrets.FIREBASE_SERVICE_ACCOUNT_BLOWFISH_TUTORIAL }}'
          channelId: live
projectId: blowfish-tutorialfirebase-hosting-pull-request.yml#
# This file was auto-generated by the Firebase CLI
# https://github.com/firebase/firebase-tools

name: Deploy to Firebase Hosting on PR
'on': pull_request
jobs:
  build_and_preview:
    if: '${{ github.event.pull_request.head.repo.full_name == github.repository }}'
    runs-on: ubuntu-latest
    steps:
      - name: Hugo setup
        uses: peaceiris/actions-hugo@v2.6.0
        with:
          hugo-version: 0.115.4
          extended: true
        env:
          ACTIONS_ALLOW_UNSECURE_COMMANDS: 'true'

      - name: Check out code into the Go module directory
        uses: actions/checkout@v4
        with:
          submodules: true  # Fetch Hugo themes (true OR recursive)
          fetch-depth: 0    # Fetch all history for .GitInfo and .Lastmod

      - name: Build with Hugo
        env:
          # For maximum backward compatibility with Hugo modules
          HUGO_ENVIRONMENT: production
          HUGO_ENV: production
        run:  hugo -E -F --minify -d public

      - name: Deploy preview
        uses: FirebaseExtended/action-hosting-deploy@v0
        with:
          repoToken: '${{ secrets.GITHUB_TOKEN }}'
          firebaseServiceAccount: '${{ secrets.FIREBASE_SERVICE_ACCOUNT_BLOWFISH_TUTORIAL }}'
          expires: 30d
          channelId: preview-${{ github.event.number }}
          projectId: blowfish-tutorial
最后一步是将你的代码提交到 GitHub,让你创建的工作流负责部署你的网站。由于我们配置了 GitHub Actions,这将触发一个作业,自动配置和部署你的网站。
git add .
git commit -m "add github actions workflows"
git push
在你仓库的 Actions 标签中,你应该看到类似这样的内容。

所有步骤完成后,你的 Firebase 控制台应该显示类似下图的内容 - 包括查看你应用的链接 – 我在 https://blowfish-tutorial.web.app/ 上运行着本教程的一个版本。

结论和后续步骤#
现在你有了主页的第一个版本。你可以在本地进行更改,一旦你提交代码,它们将自动反映在线上。接下来你应该做什么?我给你留下一些有用的链接,让你获得灵感并了解更多关于 Blowfish 和 Hugo 的信息。
- https://blowfish.page/docs/
- https://blowfish.page/docs/configuration/
- https://blowfish.page/docs/shortcodes/
- https://blowfish.page/examples/
- https://blowfish.page/users/
- https://gohugo.io/documentation/